How to Integrate CapSolver with Selenium | Complete Guide 2025

Lucas Mitchell
Automation Engineer
What is Selenium?
Selenium is an open-source automation testing tool primarily used for automating web applications. It is also commonly used for web scraping and automating website interactions. Selenium can simulate various user behaviors in a browser, such as clicking, typing, scrolling, and switching pages. It was originally developed by Jason Huggins in 2004 and is now maintained by the Selenium project team. Selenium supports multiple programming languages, including Python, Java, C#, Ruby, and JavaScript.
Selenium consists of the following core components:
-
Selenium WebDriver (most commonly used)
- Provides native control over the browser, supporting major browsers like Chrome, Firefox, Edge, and Safari.
- Can simulate various browser actions such as clicking, typing, scrolling, and switching tabs.
- Each browser has a corresponding driver, such as
chromedriverorgeckodriver.
-
Selenium IDE
- A browser extension (for Chrome/Firefox) that allows recording and playback of test scripts. It's ideal for beginners in testing.
-
Selenium Grid
- Enables distributed testing by forming a test grid with multiple browsers and machines, allowing parallel execution of scripts.
Common Use Cases
- Scraping dynamic content: Extract data generated by JavaScript rendering.
- Handling complex interactions: Suitable for scraping sites that require login or multi-step actions to access data.
- Extracting data from SPA applications: Crawl pages built with frameworks like Vue or React.
- Automated testing: Validate page functionality while simultaneously collecting data.
- Working with headless mode: Perform all operations without a graphical interface, ideal for running on servers.
Basic Usage of Selenium
To use Selenium in Python:
bash
pip install seleniumTo use Selenium with Chrome, download the chromedriver that matches your Chrome version from Github
Example: Using Selenium to get all blog post titles from CapSolver’s blog:
python
from selenium import webdriver
from selenium.webdriver.chrome.service import Service
from selenium.webdriver.chrome.options import Options
from selenium.webdriver.common.by import By
from selenium.webdriver.support.ui import WebDriverWait
from selenium.webdriver.support import expected_conditions as EC

chrome_options = Options()
chrome_options.add_argument("--start-maximized")

# Specify chromedriver path (if already added to PATH, can be omitted)
service = Service(executable_path="chromedriver.exe")
driver = webdriver.Chrome(options=chrome_options, service=service)

try:
    driver.get("https://www.capsolver.com/blog/All")
    WebDriverWait(driver, 10).until(EC.presence_of_element_located((By.TAG_NAME, 'h5')))

    h5_elements = driver.find_elements(By.TAG_NAME, "h5")
    for el in h5_elements:
        print(el.text.strip())

finally:
    driver.quit()
How to Integrate CapSolver Extension with Selenium
Selenium is a powerful tool that supports loading browser extensions just like a regular browser.
-
Download the latest extension
.zippackage from the official CapSolver GitHub and unzip it:
👉 https://github.com/capsolver/capsolver-browser-extension/releases -
In Selenium’s startup options, use the
load-extensionargument to specify the extension path:
python
from selenium import webdriver
from selenium.webdriver.chrome.service import Service
from selenium.webdriver.chrome.options import Options
from selenium.webdriver.common.by import By
from selenium.webdriver.support.ui import WebDriverWait
from selenium.webdriver.support import expected_conditions as EC

chrome_options = Options()
chrome_options.add_argument("--start-maximized")
chrome_options.add_argument("load-extension=/path/to/capSolver extension")

# Specify chromedriver path (omit if already in PATH)
service = Service(executable_path="chromedriver.exe")
driver = webdriver.Chrome(options=chrome_options, service=service)

try:
    driver.get("https://www.capsolver.com/blog/All")
    WebDriverWait(driver, 10).until(EC.presence_of_element_located((By.TAG_NAME, 'h5')))

    h5_elements = driver.find_elements(By.TAG_NAME, "h5")
    for el in h5_elements:
        print(el.text.strip())

finally:
    driver.quit()
⚠️ Important: Starting from Chrome v137, browser automation may fail to load extensions unless you manually add the following argument.
Without this flag, solving CAPTCHAs via extensions will not work on Chrome 137+:
pythonchrome_options.add_argument("--disable-features=DisableLoadExtensionCommandLineSwitch")
More details: SeleniumHQ. Different versions may behave differently—adjust according to your environment.
Using CapSolver Extension to Solve reCAPTCHA v2
CAPTCHAs like reCAPTCHA, Cloudflare Turnstile, AWS WAF, and GeeTest are widely used across thousands of websites. However, their DOM structures remain mostly consistent across sites. CapSolver Extension can automatically detect and solve these CAPTCHAs based on their distinct characteristics—no manual interaction is needed.
Let’s take reCAPTCHA v2 as an example and demonstrate how to use CapSolver Extension within Selenium to bypass it.
(Note: unless otherwise stated, the following demo uses click mode: set in /assets/config.js → reCaptchaMode: 'click')
🛠️ Don’t forget to unzip the extension and configure your
apiKeyin/assets/config.js
python
import time
from selenium import webdriver
from selenium.webdriver.chrome.service import Service
from selenium.webdriver.chrome.options import Options
from selenium.webdriver.common.by import By
from selenium.webdriver.support.ui import WebDriverWait
from selenium.webdriver.support import expected_conditions as EC

chrome_options = Options()
chrome_options.add_argument("--start-maximized")

# Step 1: Get the extension from GitHub: https://github.com/capsolver/capsolver-browser-extension/releases
# Step 2: Unzip the extension and set your apiKey in /assets/config.js
chrome_options.add_argument("load-extension=/path/to/CapSolver Browser Extension-v1.16.0")

# Specify chromedriver path (omit if already in PATH)
service = Service(executable_path="chromedriver.exe")
driver = webdriver.Chrome(options=chrome_options, service=service)

try:
    driver.get("https://recaptcha-demo.appspot.com/recaptcha-v2-checkbox.php")
    WebDriverWait(driver, 10).until(EC.presence_of_element_located((By.CSS_SELECTOR, 'form[action="/recaptcha-v2-checkbox.php"]')))

    # The extension will automatically detect and solve the reCAPTCHA
    time.sleep(15)

    # After solving, click the submit button
    submit_button = driver.find_element(By.CSS_SELECTOR, 'button[type="submit"]')
    submit_button.click()
    time.sleep(3)

except Exception as error:
    print(error)

finally:
    driver.quit()
CapSolver Extension also supports many useful configuration options. All settings can be adjusted in the
/assets/config.jsfile.
solvedCallback Configuration Option
In the previous example, we waited 15 seconds after loading the page before clicking the submit button. This waiting period was intended to give the CapSolver extension enough time to automatically solve the reCAPTCHA.
However, this approach isn’t elegant. In practice, solving the CAPTCHA might take much less than 15 seconds, or in cases of a slow network, more than 15 seconds.
To address this, CapSolver provides a configuration option called solvedCallback. This allows you to define a callback function that gets triggered once the CAPTCHA is successfully solved. You can find the solvedCallback option in /assets/config.js, and you can customize the function name—by default, it's captchaSolvedCallback.
If you're using Puppeteer or Playwright, you can expose this callback function to the browser context using the page.exposeFunction method. See:
What About Python + Selenium?
Unfortunately, Python’s Selenium does not provide a built-in equivalent to page.exposeFunction, so the solvedCallback feature cannot be fully utilized in this environment.
Instead, we recommend using DOM observation to determine whether the CAPTCHA has been solved. For example, you can check if the "I'm not a robot" checkbox has disappeared or turned into a checkmark (✔), indicating that the validation is complete.
Let’s improve the previous example by using this strategy:
python
import time
from selenium import webdriver
from selenium.webdriver.chrome.service import Service
from selenium.webdriver.chrome.options import Options
from selenium.webdriver.common.by import By
from selenium.webdriver.support.ui import WebDriverWait
from selenium.webdriver.support import expected_conditions as EC

chrome_options = Options()
chrome_options.add_argument("--start-maximized")

# Step 1: Get the extension from GitHub: https://github.com/capsolver/capsolver-browser-extension/releases
# Step 2: Unzip the extension and set your apiKey in /assets/config.js
chrome_options.add_argument("load-extension=/path/to/CapSolver Browser Extension-v1.16.0")

# Specify chromedriver path (omit if already in PATH)
service = Service(executable_path="chromedriver.exe")
driver = webdriver.Chrome(options=chrome_options, service=service)

def check_recaptcha_status(driver):
    try:
        iframe = driver.find_element(By.CSS_SELECTOR, 'iframe[src*="recaptcha"]')
        driver.switch_to.frame(iframe)

        # Check if the class name indicates the checkbox has been checked
        recaptcha_anchor = driver.find_element(By.ID, "recaptcha-anchor")
        class_list = recaptcha_anchor.get_attribute("class")
        driver.switch_to.default_content()
        if "recaptcha-checkbox-checked" in class_list.split():
            return True
        else:
            return False
    except Exception as e:
        print(f"Failed to check reCAPTCHA status: {e}")
        driver.switch_to.default_content()
        return False

try:
    driver.get("https://recaptcha-demo.appspot.com/recaptcha-v2-checkbox.php")
    WebDriverWait(driver, 10).until(EC.presence_of_element_located((By.CSS_SELECTOR, 'form[action="/recaptcha-v2-checkbox.php"]')))

    # The extension will automatically recognize and solve the CAPTCHA.
    # Instead of sleeping a fixed time, check periodically.
    timeout = 30
    start_time = time.time()
    while time.time() - start_time < timeout:
        if check_recaptcha_status(driver):
            print("reCAPTCHA verification successful!")
            submit_button = driver.find_element(By.CSS_SELECTOR, 'button[type="submit"]')
            submit_button.click()
            time.sleep(3)
            driver.quit()
            break
        time.sleep(1)

except Exception as error:
    print(error)

finally:
    driver.quit()
manualSolving Configuration Option
In the previous examples, the CAPTCHA solving process starts automatically as soon as the page finishes loading. However, in some cases, you may need to perform other actions first—such as filling in a username and password—before triggering the CAPTCHA solver. Solving the CAPTCHA too early may result in the token expiring before submission.
The manualSolving option is designed to address this issue. By setting manualSolving: true in /assets/config.js, you can manually trigger CAPTCHA solving using one of the following two methods:
- Simulate a click on the CapSolver extension button via Selenium.
- Execute a script to post a message:
window.postMessage({ type: 'capsolverSolve' });
(Note: This method is supported in extension versions v1.16.0 and above.)
The following example demonstrates how to use both methods:
python
import time
from selenium import webdriver
from selenium.webdriver.chrome.service import Service
from selenium.webdriver.chrome.options import Options
from selenium.webdriver.common.by import By
from selenium.webdriver.support.ui import WebDriverWait
from selenium.webdriver.support import expected_conditions as EC

chrome_options = Options()
chrome_options.add_argument("--start-maximized")

# Step 1: Get the extension from GitHub (https://github.com/capsolver/capsolver-browser-extension/releases)
# Step 2: Unzip the extension and configure your apiKey in /assets/config.js
chrome_options.add_argument("load-extension=/path/to/CapSolver Browser Extension-v1.16.0")

# Specify chromedriver path (omit if already in PATH)
service = Service(executable_path="chromedriver.exe")
driver = webdriver.Chrome(options=chrome_options, service=service)

def check_recaptcha_status(driver):
    try:
        iframe = driver.find_element(By.CSS_SELECTOR, 'iframe[src*="recaptcha"]')
        driver.switch_to.frame(iframe)

        # Determine whether the checkbox has been checked
        recaptcha_anchor = driver.find_element(By.ID, "recaptcha-anchor")
        class_list = recaptcha_anchor.get_attribute("class")
        driver.switch_to.default_content()
        if "recaptcha-checkbox-checked" in class_list.split():
            return True
        else:
            return False
    except Exception as e:
        print(f"Failed to check reCAPTCHA status: {e}")
        driver.switch_to.default_content()
        return False

try:
    driver.get("https://recaptcha-demo.appspot.com/recaptcha-v2-checkbox.php")
    WebDriverWait(driver, 10).until(EC.presence_of_element_located((By.CSS_SELECTOR, 'form[action="/recaptcha-v2-checkbox.php"]')))

    # Simulate user input
    driver.execute_script("""
        const inputA = document.querySelector('input[name="ex-a"]');
        inputA.value = 'username';
        const inputB = document.querySelector('input[name="ex-b"]');
        inputB.value = 'password';
    """)

    # Simulate additional operations
    for i in range(1, 6):
        time.sleep(1)
        print(f"Waited {i} seconds...")

    # Trigger CAPTCHA solving (manualSolving must be set to true in config.js)
    print("Start solving captcha...")

    # Method 1: Simulate clicking the CapSolver button
    try:
        capsolver_button = WebDriverWait(driver, 10).until(EC.presence_of_element_located((By.CSS_SELECTOR, "#capsolver-solver-tip-button")))
        driver.execute_script("arguments[0].click();", capsolver_button)
    except Exception as e:
        print(f"Unable to find CapSolver button: {e}")

    # Method 2: Trigger via postMessage (alternative method)
    # driver.execute_script("window.postMessage({ type: 'capsolverSolve' });")

    # Wait for the CAPTCHA to be solved and submit the form
    timeout = 30
    start_time = time.time()
    while time.time() - start_time < timeout:
        if check_recaptcha_status(driver):
            print("reCAPTCHA verification successful!")
            submit_button = driver.find_element(By.CSS_SELECTOR, 'button[type="submit"]')
            submit_button.click()
            time.sleep(3)
            driver.quit()
            break
        time.sleep(1)

except Exception as error:
    print(error)

finally:
    driver.quit()
reCaptchaMode Configuration
reCaptchaMode supports two modes: click and token.
- click: Simulates a human by clicking on image challenges.
- token: Skips any clicking and directly submits the task to CapSolver’s backend via API, returning a token once the CAPTCHA is solved.
If you notice that using the click mode requires multiple rounds of image challenges, it likely indicates a low-quality local environment. In that case, it’s recommended to use the token mode for better performance.
| Click Mode | Token Mode |
|---|---|
 |
 |
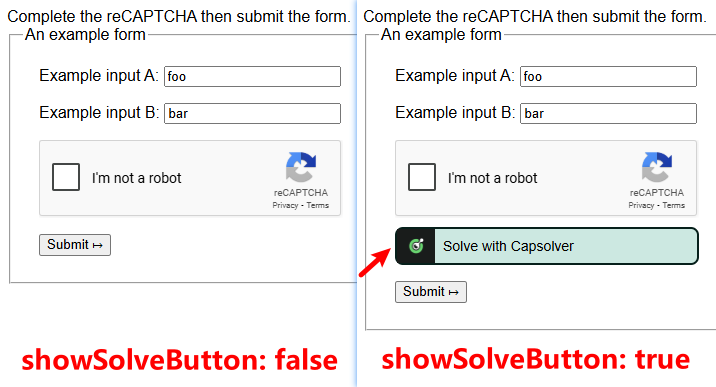
showSolveButton Configuration
When you set showSolveButton: false (default is true), the CapSolver solve button will no longer appear on the page.
However, this does not affect the CAPTCHA-solving functionality—it will still work normally in the background.
useProxy Configuration
After enabling useProxy: true, you can specify the following proxy settings:
proxyTypehostOrIpportproxyLoginproxyPassword
We will then use your custom proxy to solve the CAPTCHA.
When should you use your own proxy? Here are two common scenarios:
- Your proxy offers better quality (e.g., generates a higher score for reCAPTCHA tokens) or faster solving speed.
- In some cases, the IP used to solve the CAPTCHA must match the IP used to submit the token, which requires using your proxy.
The above are some commonly used configuration options. You can adjust other settings according to your actual needs. If you have any questions, please contact our customer support.
Solving ImageToText with CapSolver Extension
Unlike third-party CAPTCHAs like reCAPTCHA, Cloudflare Turnstile, AWS WAF, there is another category of CAPTCHA that requires recognizing letters or numbers from an image — we refer to these as ImageToText CAPTCHAs. They typically look like this:
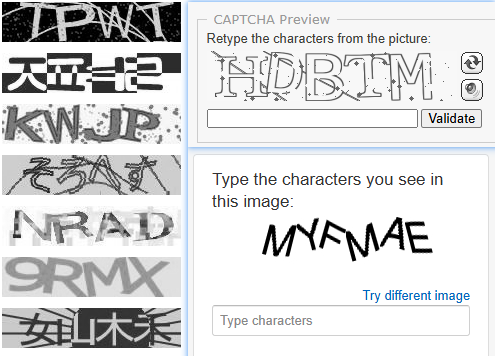
ImageToText CAPTCHAs are usually custom implementations by website owners. Because the placement of these CAPTCHAs varies across different websites and pages, CapSolver Extension cannot automatically detect which images are CAPTCHAs. You need to manually indicate this in your code.
Here’s how you do it:
- Add a
capsolver-image-to-text-sourceattribute (value0) to the CAPTCHA image element. - Add a
capsolver-image-to-text-resultattribute (value0) to the result input element.
Both capsolver-image-to-text-source and capsolver-image-to-text-result can be configured in /assets/config.js, under the options textCaptchaSourceAttribute and textCaptchaResultAttribute, respectively.
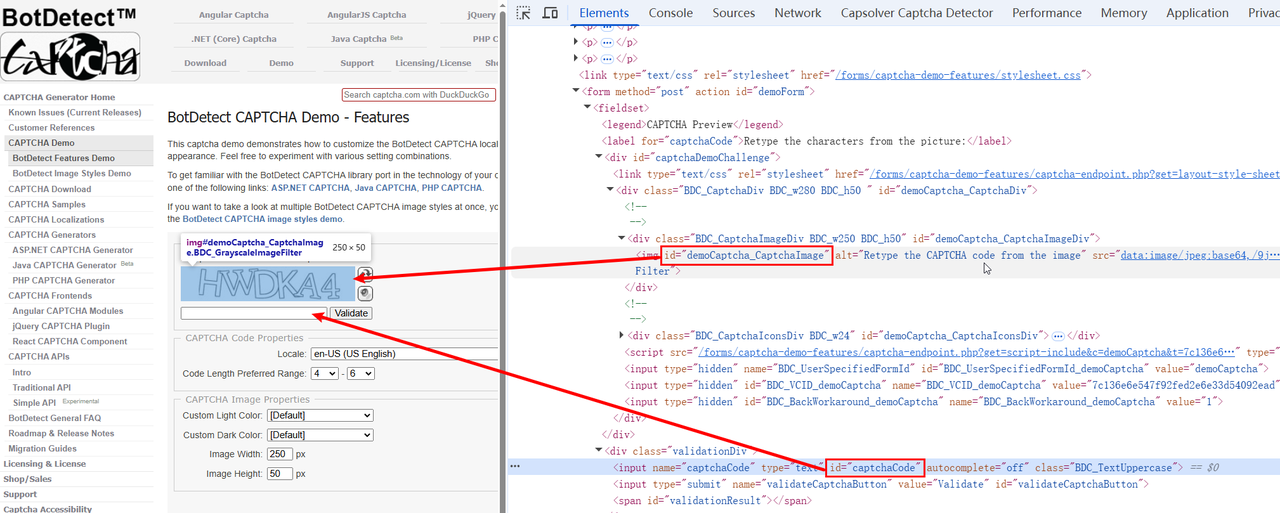
Let’s take demo as an example, and demonstrate how to solve an ImageToText CAPTCHA using Selenium:
From the page source, we identify:
- CAPTCHA image element ID:
demoCaptcha_CaptchaImage - Result input field ID:
captchaCode
Like this:

We can now add the required attributes using the setAttribute method in our Selenium script:
python
import time
from selenium import webdriver
from selenium.webdriver.chrome.service import Service
from selenium.webdriver.chrome.options import Options
from selenium.webdriver.common.by import By
from selenium.webdriver.support.ui import WebDriverWait
from selenium.webdriver.support import expected_conditions as EC

chrome_options = Options()
chrome_options.add_argument("--start-maximized")

# Step 1: Get the extension from GitHub (https://github.com/capsolver/capsolver-browser-extension/releases)
# Step 2: Unzip the extension zip file and configure your apiKey in /assets/config.js
chrome_options.add_argument("load-extension=/path/to/CapSolver Browser Extension-v1.16.0")

# Specify the path to chromedriver (can omit if added to PATH)
service = Service(executable_path="chromedriver.exe")
driver = webdriver.Chrome(options=chrome_options, service=service)

try:
    driver.get("https://captcha.com/demos/features/captcha-demo.aspx")
    WebDriverWait(driver, 10).until(EC.presence_of_element_located((By.CSS_SELECTOR, '#demoCaptcha_CaptchaImage')))

    # Tell the CapSolver extension where the CAPTCHA image is
    driver.execute_script("""
        const imgElement = document.querySelector('#demoCaptcha_CaptchaImage');
        if (imgElement) {
            imgElement.setAttribute('capsolver-image-to-text-source', '0');
        }
    """)

    # Tell the CapSolver extension where the recognition result should be entered
    driver.execute_script("""
        const resultElement = document.querySelector('#captchaCode');
        if (resultElement) {
            resultElement.setAttribute('capsolver-image-to-text-result', '0');
        }
    """)

    time.sleep(5)
    validate_button = WebDriverWait(driver, 10).until(EC.element_to_be_clickable((By.ID, 'validateCaptchaButton')))
    validate_button.click()
    time.sleep(5)

except Exception as error:
    print(error)

finally:
    driver.quit()
Expected Result:

How to Integrate CapSolver API with Selenium
Using the CapSolver browser extension is convenient and fast. However, if you're an experienced developer, we recommend using the API method instead. Compared to the extension-based integration, the API approach has several advantages:
- You can customize more parameters, and the input is more precise—capable of handling virtually all CAPTCHA scenarios.
- You have greater control over when the CAPTCHA is solved.
- The API provides more detailed error messages, helping you optimize your logic effectively.
Before You Start
You’ll need to understand how to use the CapSolver API. The process involves two steps:
- Step 1: Create a task via
https://api.capsolver.com/createTask - Step 2: Get the result via
https://api.capsolver.com/getTaskResult
When creating a task, you need to send a JSON payload to CapSolver, which typically includes parameters such as your clientKey, websiteURL, websiteKey, etc. These parameters vary depending on the type of CAPTCHA and the target website. For full details, refer to our documentation
Solving reCAPTCHA v2 with CapSolver API
Before solving reCAPTCHA v2, please refer to the guide:
👉 https://docs.capsolver.com/en/guide/captcha/ReCaptchaV2/
It explains exactly which JSON fields to include in your request.
Additionally, you can use the CapSolver extension to quickly extract the required JSON data. See this blog for help:
🔗 obtain the JSON data
Let's take the following example: https://recaptcha-demo.appspot.com/recaptcha-v2-checkbox.php,
The JSON payload needed is:
json
{
    "type": "ReCaptchaV2TaskProxyLess",
    "websiteKey": "6LfW6wATAAAAAHLqO2pb8bDBahxlMxNdo9g947u9",
    "websiteURL": "https://recaptcha-demo.appspot.com/recaptcha-v2-checkbox.php"
}
We also provide Python code samples for using the API in our documentation:

Example: Integrating with Selenium (Python)
python
import time
import requests
from selenium import webdriver
from selenium.webdriver.chrome.service import Service
from selenium.webdriver.chrome.options import Options
from selenium.webdriver.common.by import By
from selenium.webdriver.support.ui import WebDriverWait
from selenium.webdriver.support import expected_conditions as EC

chrome_options = Options()
chrome_options.add_argument("--start-maximized")

# Specify the path to chromedriver (skip if it's already in PATH)
service = Service(executable_path="chromedriver.exe")
driver = webdriver.Chrome(options=chrome_options, service=service)

# TODO: Configure your CapSolver settings
api_key = "YOUR_API_KEY"  # Replace with your CapSolver API key
site_key = "6LfW6wATAAAAAHLqO2pb8bDBahxlMxNdo9g947u9"  # reCAPTCHA site key
site_url = "https://recaptcha-demo.appspot.com/recaptcha-v2-checkbox.php"  # Target page URL
captcha_type = 'ReCaptchaV2TaskProxyLess'

def capsolver():
    payload = {
        "clientKey": api_key,
        "task": {
            "type": captcha_type,
            "websiteKey": site_key,
            "websiteURL": site_url
        }
    }
    res = requests.post("https://api.capsolver.com/createTask", json=payload)
    resp = res.json()
    task_id = resp.get("taskId")
    if not task_id:
        print("Failed to create task:", res.text)
        return ""
    print(f"Got taskId: {task_id} / Getting result...")

    while True:
        time.sleep(1)
        payload = {"clientKey": api_key, "taskId": task_id}
        res = requests.post("https://api.capsolver.com/getTaskResult", json=payload)
        resp = res.json()
        status = resp.get("status")
        if status == "ready":
            return resp.get("solution", {}).get('gRecaptchaResponse')
        if status == "failed" or resp.get("errorId"):
            print("Solve failed! response:", res.text)
            return ""

try:
    token = capsolver()
    print("token:", token)

    driver.get(site_url)
    WebDriverWait(driver, 10).until(EC.presence_of_element_located((By.CSS_SELECTOR, 'form[action="/recaptcha-v2-checkbox.php"]')))

    # Inject the reCAPTCHA response token
    driver.execute_script("""
        const textarea = document.getElementById('g-recaptcha-response');
        if (textarea) {
            textarea.value = arguments[0];
        }
    """, token)

    # Click the submit button
    submit_button = WebDriverWait(driver, 10).until(EC.element_to_be_clickable((By.CSS_SELECTOR, 'button[type="submit"]')))
    submit_button.click()
    time.sleep(5)

except Exception as error:
    print(error)

finally:
    driver.quit()
Solving ImageToText with the CapSolver API
Let’s continue using the example site: https://captcha.com/demos/features/captcha-demo.aspx.
On this page, the CAPTCHA image element has the ID demoCaptcha_CaptchaImage, and the input field for the result has the ID captchaCode, as shown in the screenshot below:
In an ImageToTextTask, we need to pass the base64-encoded value of the CAPTCHA image to CapSolver. Here’s a working example:
python
import time
import requests
from selenium import webdriver
from selenium.webdriver.chrome.service import Service
from selenium.webdriver.chrome.options import Options
from selenium.webdriver.common.by import By
from selenium.webdriver.support.ui import WebDriverWait
from selenium.webdriver.support import expected_conditions as EC

chrome_options = Options()
chrome_options.add_argument("--start-maximized")

# Specify chromedriver path (can be omitted if it's in your PATH)
service = Service(executable_path="chromedriver.exe")
driver = webdriver.Chrome(options=chrome_options, service=service)

# TODO: Set your CapSolver configuration
api_key = "YOUR_API_KEY"  # Replace with your CapSolver API key
site_url = "https://captcha.com/demos/features/captcha-demo.aspx"  # Target page URL
captcha_type = 'ImageToTextTask'

def capsolver(base64Image):
    payload = {
        "clientKey": api_key,
        "task": {
            "type": captcha_type,
            "websiteURL": site_url,
            "body": base64Image
        }
    }
    res = requests.post("https://api.capsolver.com/createTask", json=payload)
    resp = res.json()
    status = resp.get("status")
    if status == "ready":
        return resp.get("solution", {}).get('text')
    elif status == "failed" or resp.get("errorId"):
        print("Solve failed! response:", res.text)
        return ""
    else:
        print("Unknown response:", resp.text)
        return ""

try:
    driver.get(site_url)
    WebDriverWait(driver, 10).until(EC.presence_of_element_located((By.CSS_SELECTOR, '#demoCaptcha_CaptchaImage')))

    # Retrieve the base64 string from the captcha image's src attribute
    captcha_src = driver.execute_script("""
        const img = document.querySelector('img[id="demoCaptcha_CaptchaImage"]');
        return img ? img.getAttribute('src') : null;
    """)

    if not captcha_src:
        raise Exception("Unable to obtain captcha image!")

    base64_image = captcha_src.split(',')[1]  # Remove 'data:image/png;base64,' prefix
    captcha_text = capsolver(base64_image)
    print("Text:", captcha_text)

    # Fill in the CAPTCHA result
    driver.execute_script("""
        document.getElementById('captchaCode').value = arguments[0];
    """, captcha_text)

    # Click the validate button
    validate_button = WebDriverWait(driver, 10).until(
        EC.element_to_be_clickable((By.CSS_SELECTOR, '#validateCaptchaButton'))
    )
    validate_button.click()
    time.sleep(5)

except Exception as error:
    print(error)

finally:
    driver.quit()
For certain types of complex ImageToText CAPTCHAs, you can specify different recognition models to improve accuracy. For more details, refer to the official documentation:
👉 https://docs.capsolver.com/en/guide/recognition/ImageToTextTask/
How to Integrate CapSolver SDK with Selenium
CapSolver provides official SDKs for both Python and Golang, which allow you to integrate CAPTCHA solving with minimal effort. Unlike using the raw API (where you must manually handle createTask and getTaskResult), the SDKs simplify the entire process.
Official GitHub repositories:
Solving reCAPTCHA v2 with the CapSolver SDK
Just like with the API, before solving reCAPTCHA v2, you should refer to the documentation for detailed information on which JSON parameters to send:
🔗 https://docs.capsolver.com/en/guide/captcha/ReCaptchaV2/
Additionally, you can use the CapSolver browser extension to quickly extract the required JSON data:
🔗 https://www.capsolver.com/blog/reCAPTCHA/recaptcha-v3-solver-human-score
Let’s use this page as an example:
👉 https://recaptcha-demo.appspot.com/recaptcha-v2-checkbox.php
The required JSON payload looks like this:
json
{
  "type": "ReCaptchaV2TaskProxyLess",
  "websiteKey": "6LfW6wATAAAAAHLqO2pb8bDBahxlMxNdo9g947u9",
  "websiteURL": "https://recaptcha-demo.appspot.com/recaptcha-v2-checkbox.php"
}
Install the CapSolver SDK:
bash
pip install capsolverExample: Using the SDK in Selenium
python
import time
import capsolver
from selenium import webdriver
from selenium.webdriver.chrome.service import Service
from selenium.webdriver.chrome.options import Options
from selenium.webdriver.common.by import By
from selenium.webdriver.support.ui import WebDriverWait
from selenium.webdriver.support import expected_conditions as EC

chrome_options = Options()
chrome_options.add_argument("--start-maximized")
service = Service(executable_path="chromedriver.exe")
driver = webdriver.Chrome(options=chrome_options, service=service)

# Set your CapSolver configuration
api_key = "YOUR_API_KEY"
site_key = "6LfW6wATAAAAAHLqO2pb8bDBahxlMxNdo9g947u9"
site_url = "https://recaptcha-demo.appspot.com/recaptcha-v2-checkbox.php"
captcha_type = 'ReCaptchaV2TaskProxyLess'
capsolver.api_key = api_key

try:
    # Solve using SDK
    solution = capsolver.solve({
        "type": captcha_type,
        "websiteURL": site_url,
        "websiteKey": site_key,
    })
    token = solution["gRecaptchaResponse"]
    print("token:", token)

    driver.get(site_url)
    WebDriverWait(driver, 10).until(
        EC.presence_of_element_located((By.CSS_SELECTOR, 'form[action="/recaptcha-v2-checkbox.php"]'))
    )

    driver.execute_script("""
        const textarea = document.getElementById('g-recaptcha-response');
        if (textarea) {
            textarea.value = arguments[0];
        }
    """, token)

    submit_button = WebDriverWait(driver, 10).until(
        EC.element_to_be_clickable((By.CSS_SELECTOR, 'button[type="submit"]'))
    )
    submit_button.click()
    time.sleep(5)

except Exception as error:
    print(error)

finally:
    driver.quit()
Solving ImageToText with the CapSolver SDK
Just like with the API, we’ll continue with the site:
👉 https://captcha.com/demos/features/captcha-demo.aspx
The CAPTCHA image has the ID demoCaptcha_CaptchaImage, and the result input field has the ID captchaCode.
In an ImageToTextTask, you simply need to pass the base64-encoded image to CapSolver.
Example Code:
python
import time
import capsolver
import requests
from selenium import webdriver
from selenium.webdriver.chrome.service import Service
from selenium.webdriver.chrome.options import Options
from selenium.webdriver.common.by import By
from selenium.webdriver.support.ui import WebDriverWait
from selenium.webdriver.support import expected_conditions as EC

chrome_options = Options()
chrome_options.add_argument("--start-maximized")
service = Service(executable_path="chromedriver.exe")
driver = webdriver.Chrome(options=chrome_options, service=service)

# Set your CapSolver configuration
api_key = "YOUR_API_KEY"
site_url = "https://captcha.com/demos/features/captcha-demo.aspx"
captcha_type = 'ImageToTextTask'
capsolver.api_key = api_key

try:
    driver.get(site_url)
    WebDriverWait(driver, 10).until(
        EC.presence_of_element_located((By.CSS_SELECTOR, '#demoCaptcha_CaptchaImage'))
    )

    # Get base64 string from the image
    captcha_src = driver.execute_script("""
        const img = document.querySelector('img[id="demoCaptcha_CaptchaImage"]');
        return img ? img.getAttribute('src') : null;
    """)
    if not captcha_src:
        raise Exception("Unable to obtain captcha image!")

    base64_image = captcha_src.split(',')[1]
    solution = capsolver.solve({
        "type": captcha_type,
        "websiteURL": site_url,
        "body": base64_image,
    })
    captcha_text = solution["text"]
    print("Text:", captcha_text)

    driver.execute_script("""
        document.getElementById('captchaCode').value = arguments[0];
    """, captcha_text)

    validate_button = WebDriverWait(driver, 10).until(
        EC.element_to_be_clickable((By.CSS_SELECTOR, '#validateCaptchaButton'))
    )
    validate_button.click()
    time.sleep(5)

except Exception as error:
    print(error)

finally:
    driver.quit()
Useful References
- CapSolver Documentation
- CapSolver Extension GitHub Releases
- CapSolver Extension on Chrome Web Store
- CapSolver Extension on Firefox Add-ons
- Human-like Score Solver for reCAPTCHA v3
Demo Videos Featuring the CapSolver Extension:
- Solve reCAPTCHA v3 with CapSolver Chrome Extension
- Solve reCAPTCHA v2 with CapSolver Chrome Extension
- Solve reCAPTCHA with Puppeteer & CapSolver Extension
- Solve ImageToText with Puppeteer & CapSolver Extension
Additionally, CapSolver offers a Developer Revenue Sharing Program, allowing developers and partners to earn commissions by integrating or promoting CapSolver solutions. It’s a great way to monetize your work while helping others solve captchas efficiently. For full details, check out:
CapSolver Developer Plan
Conclusion
This guide has shown you how to effectively integrate Selenium with CapSolver for handling CAPTCHAs. We covered Selenium's core features for web automation and highlighted two main CapSolver integration methods:
More
aws wafJul 23, 2026
How to Solve AWS WAF in LangChain with CapSolver
Build an authorized AWS WAF LangChain workflow with CapSolver tools, response detection, policy gates, session handling, retries, and verification.

AIJul 23, 2026
How to Solve Cloudflare Turnstile in LangGraph Agents
Build a LangGraph Cloudflare Turnstile solver workflow with CapSolver, Playwright session handling, policy gates, retries, verification, and review.