How to Integrate CapSolver with Puppeteer | Complete Guide 2025

Lucas Mitchell
Automation Engineer
What is Puppeteer?
Puppeteer is a JavaScript library that provides a high-level API to control Chrome or Firefox using the DevTools Protocol or WebDriver BiDi.
Originally designed for browser automation testing, Puppeteer has become one of the most important tools for modern web scraping due to its powerful web page manipulation capabilities.
In traditional web scraping, most page content is static and can be extracted directly by requesting the HTML and parsing it using regular expressions or DOM parsing tools. However, many modern websites use JavaScript to load data asynchronously — especially those built with frameworks like Vue and React, which rely on Single Page Applications (SPA). In these cases, the content only becomes available after the browser executes the JavaScript.
Puppeteer addresses this challenge by directly controlling a real browser. It can simulate real user behavior such as opening pages, waiting for full page loads, clicking, typing, scrolling, and more — making it ideal for scraping front-end rendered content.
Why Use Puppeteer for Web Scraping?
1. Real Browser Environment
- Fully renders JavaScript-powered web pages.
- Supports modern web features like WebSocket, WebWorker, and more.
- Bypasses static-site limitations in traditional scrapers.
2. Automated User Interactions
- Simulate clicks, form submissions, keyboard inputs, scroll events.
- Suitable for scraping data from login-required or interactive websites.
3. Network Request Control
- Intercept and modify requests.
- Block unnecessary resources like ads/images to improve efficiency.
- Capture and inspect XHR/Fetch API responses.
4. Smart Page Management
- Wait for elements, network requests, or timeouts for precise data extraction timing.
- Snapshot pages at different stages (e.g., DOMContentLoaded).
5. Anti-Bot and CAPTCHA Bypass Friendly
- Offers more realistic fingerprinting than raw HTTP clients.
- Supports proxy configuration, custom User-Agent, language settings, etc.
Common Use Cases of Puppeteer
- Scraping dynamic content rendered by JavaScript
- Interacting with complex web apps requiring login or multi-step navigation
- Extracting data from SPA websites built with Vue, React, Angular
- Generating PDFs, screenshots, or visual reports
- Automated browser testing with scraping capabilities
- Running in headless mode on server environments
Basic Steps for Using Puppeteer
Step 1: Install Puppeteer
You can install Puppeteer in two ways:
bash
npm i puppeteer        # This will download Puppeteer along with a compatible version of Chromium.
npm i puppeteer-core   # Use this if you already have Chrome installed and just need the Puppeteer library.
Step 2: Extract Blog Titles with Puppeteer
In the example below, We use Puppeteer to navigate to the CapSolver blog and grab all the <h5> blog post titles from the page

javascript
const puppeteer = require('puppeteer');

(async () => {
    const browser = await puppeteer.launch({
        headless: false,
        args: ['--window-size=1920,1080'],
        defaultViewport: null
    });
    const [page] = await browser.pages();

    await page.goto('https://www.capsolver.com/blog/All');

    const h5Titles = await page.evaluate(() => {
        const headings = Array.from(document.querySelectorAll('h5'));
        return headings.map(heading => heading.textContent.trim());
    });

    console.log(h5Titles);
    await browser.close();
})();
By controlling a real browser instance, I can wait for JavaScript-rendered content to load, just like a regular user would. This makes Puppeteer incredibly useful for scraping modern websites that use frameworks like Vue or React.
How to Integrate CapSolver Extension with Puppeteer
One of Puppeteer's powerful features is its support for loading browser extensions, which allows integration with the CapSolver browser extension for solving CAPTCHA challenges. Step-by-Step integration:
Step 1. Download the CapSolver Extension
First, download the latest version of the CapSolver extension from the official GitHub releases page
Once downloaded, unzip the .zip file to get the extension folder.
Step 2. Launch Puppeteer with the Extension
Now that you have the extension folder ready, you can load it into Puppeteer by using the --disable-extensions-except and --load-extension flags when launching the browser:
javascript
const puppeteer = require('puppeteer');

// Replace this with the actual path to your unpacked CapSolver extension
const extensionPath = 'path/to/capsolver-extension';

(async () => {
    const browser = await puppeteer.launch({
        headless: false,
        args: [
            `--disable-extensions-except=${extensionPath}`,
            `--load-extension=${extensionPath}`,
        ],
    });

    const [page] = await browser.pages();
    await page.goto('https://www.capsolver.com/blog/All');

    // You can now use the CapSolver extension functionality within this session

    await browser.close();
})();
Solve reCAPTCHA v2 with CapSolver Extension
CAPTCHA types like reCAPTCHA v2/v3, Cloudflare Turnstile, AWS WAF, and Imagetotext are widely used across thousands of websites. Despite their popularity, these CAPTCHAs typically have consistent and detectable DOM structures. That’s where CapSolver Extension comes in — it detects and solves them automatically without the need for manual interaction.
Let’s take reCAPTCHA v2 as an example to demonstrate how to use the CapSolver Extension in Puppeteer to solve captchas (Note: Unless otherwise specified, the following examples are demonstrated in click mode: /assets/config.js → reCaptchaMode: 'click').
⚠️ Don’t forget to unzip the extension zip file and configure your
apiKeyin/assets/config.js
javascript
const puppeteer = require('puppeteer');

// Step 1: Get the extension from github (https://github.com/capsolver/capsolver-browser-extension/releases)
// Step 2: Unzip the extension zip file and configure your apiKey in /assets/config.js
const extensionPath = 'path/to/CapSolver Browser Extension-v1.16.0';

(async () => {
    const browser = await puppeteer.launch({
        headless: false,
        args: [
            `--disable-extensions-except=${extensionPath}`,
            `--load-extension=${extensionPath}`,
            `--window-size=1920,1080`,
            `--lang=en-US`,
        ],
        defaultViewport: null
    });
    const [page] = await browser.pages();
    await page.goto('https://recaptcha-demo.appspot.com/recaptcha-v2-checkbox.php');
    await page.waitForSelector('form[action="/recaptcha-v2-checkbox.php"]');

    // The extension will automatically recognize the recaptcha and solve it.
    // Wait for the captcha to resolve and click the submit button.
    await new Promise(resolve => setTimeout(resolve, 15000));
    await page.click('button[type="submit"]');
    await new Promise(resolve => setTimeout(resolve, 5000));
    await browser.close();
})();
⚠️ The CapSolver extension also supports many useful configuration options. Below are some common examples (Note: All configurations are set in
/assets/config.js)
Configuration Option: solvedCallback
As we can see, the previous code waits for 15 seconds after entering the page before clicking submit. This 15-second delay is intended to give the CapSolver extension enough time to automatically solve the reCAPTCHA. However, this approach is not very elegant, as the actual time required may be much less than 15 seconds, or even more under poor network conditions.
The solvedCallback is designed to address this issue. It triggers a callback once the CAPTCHA is solved, notifying you that the verification is complete. You can find the solvedCallback option in /assets/config.js and define a custom function name—by default, it is captchaSolvedCallback. Then use the page.exposeFunction method to expose the function in the browser context.
Let’s optimize the previous code using this approach.
javascript
const puppeteer = require('puppeteer');

// Step 1: Get the extension from github (https://github.com/capsolver/capsolver-browser-extension/releases)
// Step 2: Unzip the extension zip file and configure your apiKey in /assets/config.js
const extensionPath = 'path/to/CapSolver Browser Extension-v1.16.0';

(async () => {
    const browser = await puppeteer.launch({
        headless: false,
        args: [
            `--disable-extensions-except=${extensionPath}`,
            `--load-extension=${extensionPath}`,
            `--window-size=1920,1080`,
            `--lang=en-US`,
        ],
        defaultViewport: null
    });
    const [page] = await browser.pages();
    await page.goto('https://recaptcha-demo.appspot.com/recaptcha-v2-checkbox.php');
    await page.waitForSelector('form[action="/recaptcha-v2-checkbox.php"]');

    // The extension will automatically recognize the reCAPTCHA and solve it.
    // Use solvedCallback to proceed only after CAPTCHA is solved.
    await page.exposeFunction('captchaSolvedCallback', async () => {
        console.log('Captcha solved!');

        // Determine whether verification is still needed.
        const iframe = await page.$('iframe[src*="recaptcha"]');
        if (iframe) {
            const frame = await iframe.contentFrame();
            const finished = await frame.evaluate(() => {
                const element = document.querySelector('.recaptcha-checkbox-border');
                return element && window.getComputedStyle(element).display === 'none';
            });

            if (finished) {
                console.log('Verification completed!');
                await page.click('button[type="submit"]');
                await new Promise(resolve => setTimeout(resolve, 3000));
                await browser.close();
            } else {
                console.log('Need to verify again...');
            }
        }
    });
})();
For reCAPTCHA v2, it may sometimes ask you to click through multiple rounds of images. That’s why, after each verification attempt, we need to check whether the "I'm not a robot" checkbox still exists. If the checkbox is no longer present (i.e., it has turned into a ✔️), we consider the verification completed.
Config Option: manualSolving
In the previous examples, the CAPTCHA solving process begins as soon as the page loads. However, in some cases, you may need to perform other actions first—such as entering a username and password—before triggering CAPTCHA solving. Solving the CAPTCHA too early may lead to token expiration.
manualSolving is designed to solve this issue. When enabled, it allows you to manually trigger the CAPTCHA solving process. To enable it, set the following in /assets/config.js:
js
manualSolving: trueOnce this is enabled, you can trigger CAPTCHA solving in two ways:
-
Simulate clicking the CapSolver extension button using Puppeteer;
-
Execute the following code to send a message that triggers CAPTCHA solving:
jswindow.postMessage({ type: 'capsolverSolve' });
⚠️ Note: This feature is only supported in extension versions higher than v1.16.0!
Here’s a full example demonstrating both methods:
javascript
const puppeteer = require('puppeteer');

// Step 1: Get the extension from GitHub (https://github.com/capsolver/capsolver-browser-extension/releases)
// Step 2: Unzip the extension zip file and configure your apiKey in /assets/config.js
const extensionPath = 'path/to/CapSolver Browser Extension-v1.16.0';

(async () => {
    const browser = await puppeteer.launch({
        headless: false,
        args: [
            `--disable-extensions-except=${extensionPath}`,
            `--load-extension=${extensionPath}`,
            `--window-size=1920,1080`,
            `--lang=en-US`,
        ],
        defaultViewport: null
    });
    const [page] = await browser.pages();
    await page.goto('https://recaptcha-demo.appspot.com/recaptcha-v2-checkbox.php');
    await page.waitForSelector('form[action="/recaptcha-v2-checkbox.php"]');

    // Simulate user input
    await page.evaluate(() => {
        const inputA = document.querySelector('input[name="ex-a"]');
        inputA.value = 'username';
        const inputB = document.querySelector('input[name="ex-b"]');
        inputB.value = 'password';
    });

    // Simulate other operations
    for (let i = 1; i <= 5; i++) {
        await new Promise(resolve => setTimeout(resolve, 1000));
        console.log(`Waited ${i} seconds...`);
    }

    // Trigger CAPTCHA solving (requires manualSolving: true in config.js)
    console.log('Start solving CAPTCHA...');

    // Method 1: Simulate clicking the CapSolver button
    await page.evaluate(() => {
        document.querySelector('#capsolver-solver-tip-button').click()
    });

    // Method 2: Trigger using postMessage
    // await page.evaluate(() => {
    //     window.postMessage({ type: 'capsolverSolve' });
    // });

    // Wait for CAPTCHA to be solved and then click the submit button
    await page.exposeFunction('captchaSolvedCallback', async () => {
        console.log('Captcha solved!');

        const iframe = await page.$('iframe[src*="recaptcha"]');
        if (iframe) {
            const frame = await iframe.contentFrame();
            const finished = await frame.evaluate(() => {
                const element = document.querySelector('.recaptcha-checkbox-border');
                return element && window.getComputedStyle(element).display === 'none';
            });

            if (finished) {
                console.log('Verification completed!');
                await page.click('button[type="submit"]');
                await new Promise(resolve => setTimeout(resolve, 3000));
                await browser.close();
            } else {
                console.log('Need to verify again...');
            }
        }
    });
})();
Config Option: reCaptchaMode
The reCaptchaMode option includes two modes: click and token.
- The click mode simulates human-like interaction by clicking on the images.
- The token mode skips the clicking process and directly sends the reCAPTCHA task to CapSolver's backend via API, returning the token instantly.
If you notice that the click mode requires multiple rounds of image clicking, it likely indicates that your local environment quality is poor. In such cases, we recommend using the token mode for better performance.
| Click Mode | Token Mode |
|---|---|
 |
 |
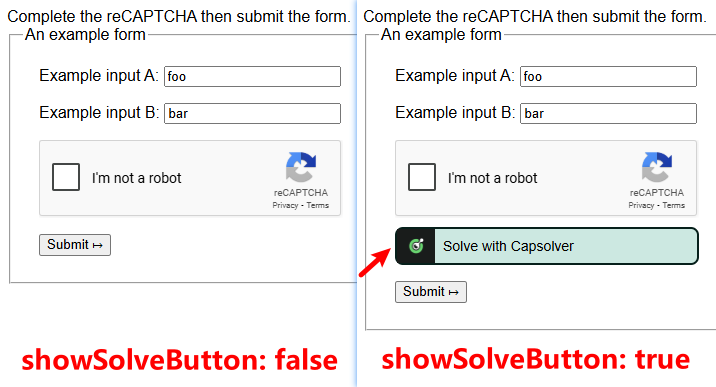
Configuration Option: showSolveButton
When showSolveButton is set to false (default is true), the CapSolver button will no longer be displayed on the page. However, this will not affect the normal CAPTCHA-solving functionality.
Configuration Option: useProxy
After setting useProxy: true and specifying proxyType, hostOrIp, port, proxyLogin, and proxyPassword, we will use your proxy to solve the captcha. When do you need to use your own proxy? Generally, there are two situations:
- Your proxy is of better quality (for example, the reCAPTCHA token generated using your proxy has a higher score) and is faster;
- In some cases, the IP used to solve the captcha needs to be consistent with the IP you use to access the token.
The above are some common configuration options. Other options can be set according to your actual needs. If you have any questions, please contact our customer support.
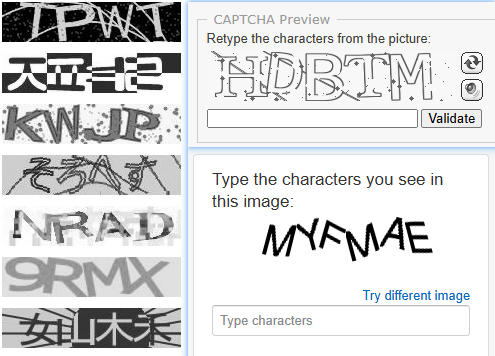
Solve ImageToText CAPTCHA with CapSolver Extension
Unlike third-party captchas such as reCAPTCHA, Cloudflare Turnstile, AWS WAF, there is another type of captcha that requires us to recognize letters and numbers from images, which we call ImageToText. They look like this:
ImageToText captchas are implemented by website administrators themselves. These captchas appear in different positions on various websites and pages, so the CapSolver extension cannot automatically identify which images are captchas. Therefore, you need to inform the CapSolver extension in your code by doing the following:
- Add a
capsolver-image-to-text-sourceattribute with the value0on the captcha image element; - Add a
capsolver-image-to-text-resultattribute with the value0on the element where the result is submitted.
Both capsolver-image-to-text-source and capsolver-image-to-text-result can be configured in /assets/config.js as textCaptchaSourceAttribute and textCaptchaResultAttribute, respectively.
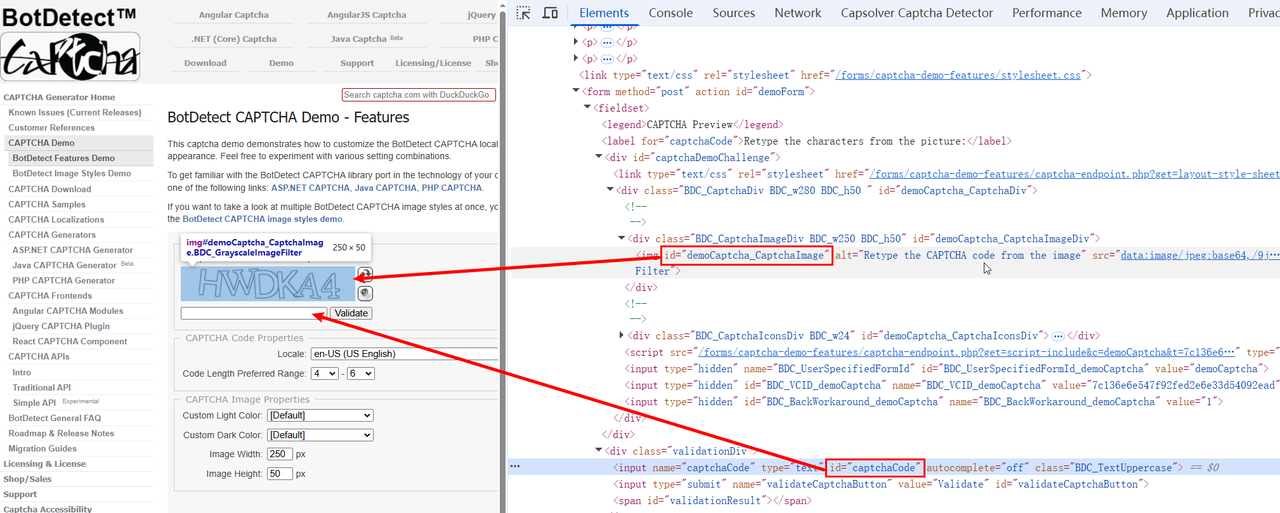
Let’s take https://captcha.com/demos/features/captcha-demo.aspx as an example to demonstrate how to solve ImageToText captchas in Puppeteer.
First, we check the webpage source code and locate the captcha image element with the id demoCaptcha_CaptchaImage and the result input box element with the id captchaCode, as shown in the figure below:

Then, in the code, we can use the setAttribute method to add the locator elements:
js
const puppeteer = require('puppeteer');

// Step 1: Get the extension from github (https://github.com/capsolver/capsolver-browser-extension/releases)
// Step 2: Unzip the extension zip file and configure your apiKey in /assets/config.js
const extensionPath = 'path/to/CapSolver Browser Extension-v1.16.0';

(async () => {
    const browser = await puppeteer.launch({
        headless: false,
        args: [
            `--disable-extensions-except=${extensionPath}`,
            `--load-extension=${extensionPath}`,
            `--window-size=1920,1080`,
            `--lang=en-US`,
        ],
        defaultViewport: null
    });
    const [page] = await browser.pages();
    await page.goto('https://captcha.com/demos/features/captcha-demo.aspx');
    await page.waitForSelector('#demoCaptcha_CaptchaImage')

    // Tell the CapSolver extension where the captcha image is located on the web page.
    await page.evaluate(() => {
        const imgElement = document.querySelector('#demoCaptcha_CaptchaImage');
        if (imgElement) {
            imgElement.setAttribute('capsolver-image-to-text-source', '0');
        }
    });

    // Tell the CapSolver extension where the captcha recognition result should be filled in on the web page.
    await page.evaluate(() => {
        const resultElement = document.querySelector('#captchaCode');
        if (resultElement) {
            resultElement.setAttribute('capsolver-image-to-text-result', '0');
        }
    });

    // Wait for the captcha to resolve and click the validate button.
    await page.exposeFunction('captchaSolvedCallback', async () => {
        console.log('Captcha solved!');
        await new Promise(resolve => setTimeout(resolve, 3000));
        await page.click('#validateCaptchaButton');
        await new Promise(resolve => setTimeout(resolve, 3000));
        await browser.close();
    });
})();
Effect achieved:

How to Integrate CapSolver API with Puppeteer
Using the CapSolver extension is convenient and quick, but if you are an experienced developer, we recommend using the API integration instead. Compared to the extension, API integration has the following advantages:
- You can customize more parameters, providing more precise data that can cover almost all captcha scenarios.
- It allows more flexible control over when to solve the captcha.
- It provides more detailed error messages, helping developers optimize accordingly.
Before we demonstrate the code, you need to understand how our API works, which mainly involves two steps:
- Step 1: https://api.capsolver.com/createTask — Create a task
- Step 2: https://api.capsolver.com/getTaskResult — Get the task result
Creating a task usually requires sending JSON data to CapSolver. The JSON data includes your clientKey, websiteURL, websiteKey, and other information. Different captcha types and websites require different data. For detailed information, please refer to our documentation
Solve reCAPTCHA v2 with CapSolver API
Before solving reCAPTCHA v2, please refer to the documentation: ReCaptchaV2. The documentation explains in detail what JSON data you should send to CapSolver. Additionally, you can use the CapSolver extension to quickly obtain the JSON data
Taking https://recaptcha-demo.appspot.com/recaptcha-v2-checkbox.php as an example, the required JSON data is:
json
{
    "type": "ReCaptchaV2TaskProxyLess",
    "websiteKey": "6LfW6wATAAAAAHLqO2pb8bDBahxlMxNdo9g947u9",
    "websiteURL": "https://recaptcha-demo.appspot.com/recaptcha-v2-checkbox.php"
}
We also provide a JS example of how to use the API in our documentation for your reference:
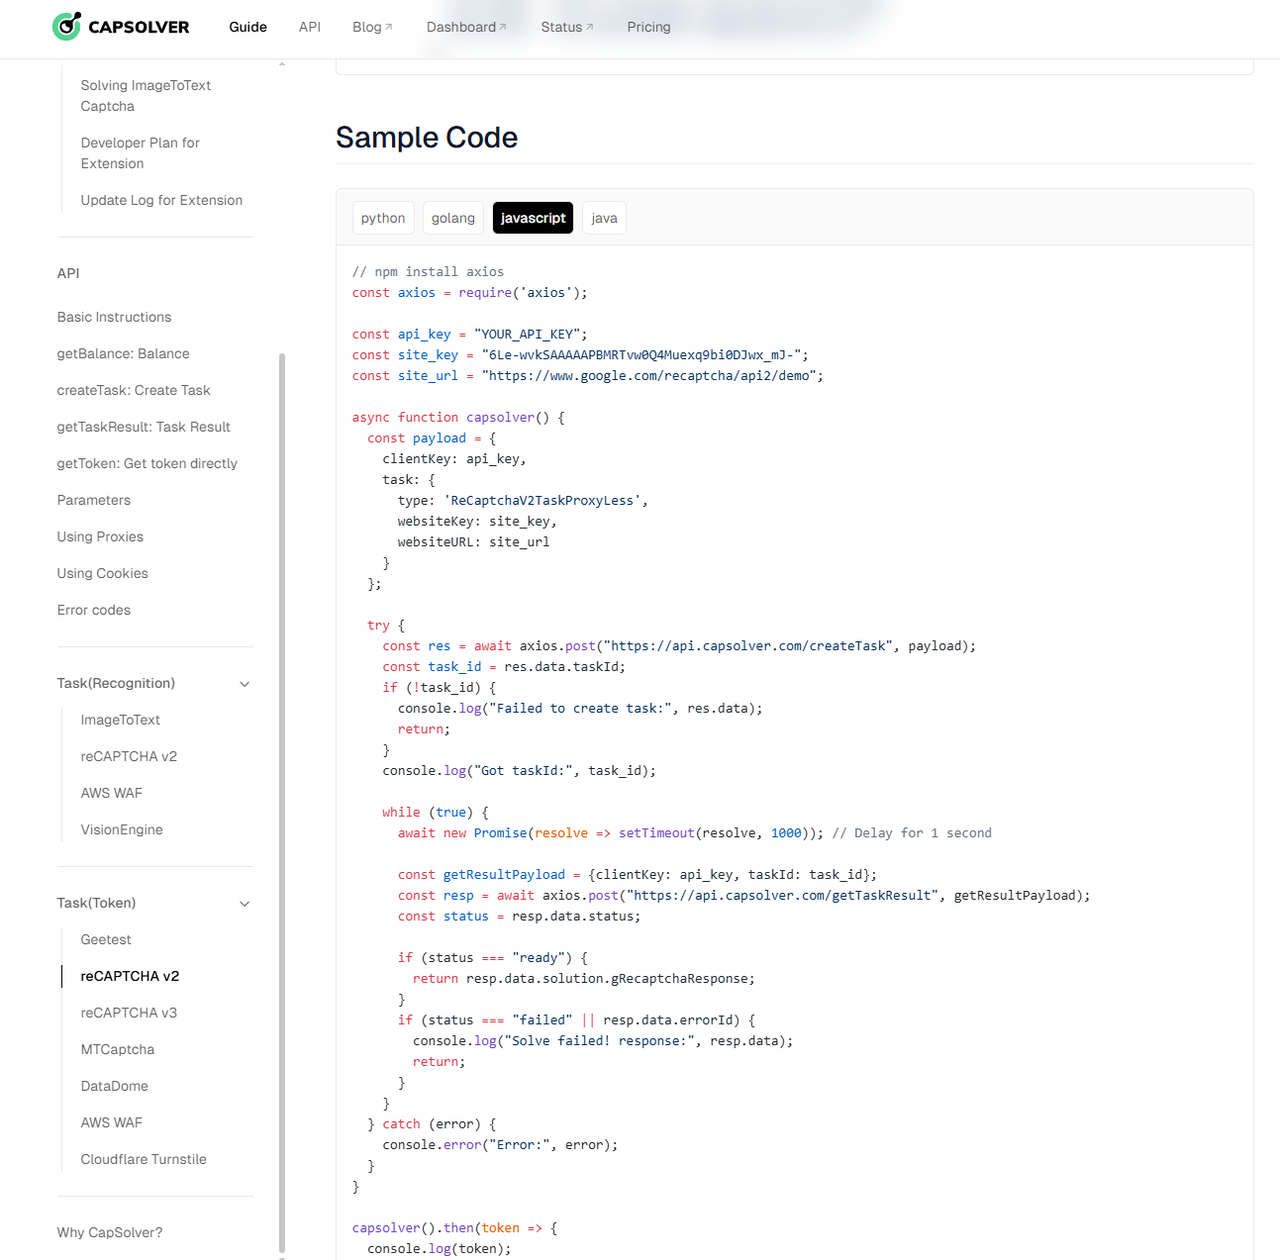
Integrating in Puppeteer:
js
const puppeteer = require('puppeteer');
const axios = require('axios');

// Replace with your API key
const api_key = 'YOUR_API_KEY';
const captcha_type = 'ReCaptchaV2TaskProxyLess';
const site_key = '6LfW6wATAAAAAHLqO2pb8bDBahxlMxNdo9g947u9';
const site_url = 'https://recaptcha-demo.appspot.com/recaptcha-v2-checkbox.php';

async function capSolver() {
    const payload = {
        clientKey: api_key,
        task: {
            type: captcha_type,
            websiteKey: site_key,
            websiteURL: site_url
        }
    };

    try {
        const res = await axios.post('https://api.capsolver.com/createTask', payload);
        const task_id = res.data.taskId;
        if (!task_id) {
            console.log('Failed to create task:', res.data);
            return;
        }
        console.log('Got taskId:', task_id);

        while (true) {
            await new Promise(resolve => setTimeout(resolve, 1000)); // Delay 1 second

            const getResultPayload = { clientKey: api_key, taskId: task_id };
            const resp = await axios.post('https://api.capsolver.com/getTaskResult', getResultPayload);
            const status = resp.data.status;

            if (status === 'ready') {
                return resp.data.solution.gRecaptchaResponse;
            }
            if (status === 'failed' || resp.data.errorId) {
                console.log('Solve failed! response:', resp.data);
                return;
            }
        }
    } catch (error) {
        console.error('Error:', error);
    }
}

(async () => {
    const browser = await puppeteer.launch({
        headless: false,
        args: [
            '--window-size=1920,1080',
            '--lang=en-US',
        ],
        defaultViewport: null
    });
    const [page] = await browser.pages();
    await page.goto('https://recaptcha-demo.appspot.com/recaptcha-v2-checkbox.php');
    await page.waitForSelector('form[action="/recaptcha-v2-checkbox.php"]');

    const token = await capSolver();
    console.log("Token:", token);

    // Set the token value
    await page.evaluate((token) => {
        const textarea = document.getElementById('g-recaptcha-response');
        if (textarea) {
            textarea.value = token;
        }
    }, token);

    await page.click('button[type="submit"]');
    await new Promise(resolve => setTimeout(resolve, 5000));
    await browser.close();
})();
Solve ImageToText with CapSolver API
Taking https://captcha.com/demos/features/captcha-demo.aspx as an example, we locate the captcha image element with the id demoCaptcha_CaptchaImage and the result input element with the id captchaCode, as shown in the image below:
For the ImageToTextTask, we need to send the base64 value of the captcha image to CapSolver. Sample code is as follows:
js
const puppeteer = require('puppeteer');
const axios = require('axios');
// Replace with your API key
const api_key = 'YOUR_API_KEY';
const captcha_type = 'ImageToTextTask';
const site_url = 'https://captcha.com/demos/features/captcha-demo.aspx';
async function capSolver(base64Image) {
const payload = {
clientKey: api_key,
task: {
type: captcha_type,
websiteURL: site_url,
body: base64Image,
}
};
try {
const res = await axios.post('https://api.capsolver.com/createTask', payload);
const status = res.data.status;
if (status === 'ready') {
return res.data.solution.text;
}
if (status === 'failed' || res.data.errorId) {
console.log('Solve failed! response:', res.data);
return "";
}
} catch (error) {
console.error('Error:', error);
}
}
(async () => {
const browser = await puppeteer.launch({
headless: false,
args: [
'--window-size=1920,1080',
'--lang=en-US',
],
defaultViewport: null
});
const [page] = await browser.pages();
await page.goto('https://captcha.com/demos/features/captcha-demo.aspx');
await page.waitForSelector('#demoCaptcha_CaptchaImage');
// Get the base64 value of the captcha image
const captchaImage = await page.evaluate(() => {
const img = document.querySelector('img[id="demoCaptcha_CaptchaImage"]');
return img ? img.getAttribute('src') : null;
});
const base64Image = captchaImage.split(',')[1];
const text = await capSolver(base64Image);
console.log("Text:", text);
// Set the recognized text value
await page.evaluate((text) => {
document.getElementById('captchaCode').value = text;
}, text);
await page.click('#validateCaptchaButton');
await new Promise(resolve => setTimeout(resolve, 5000));
await browser.close();
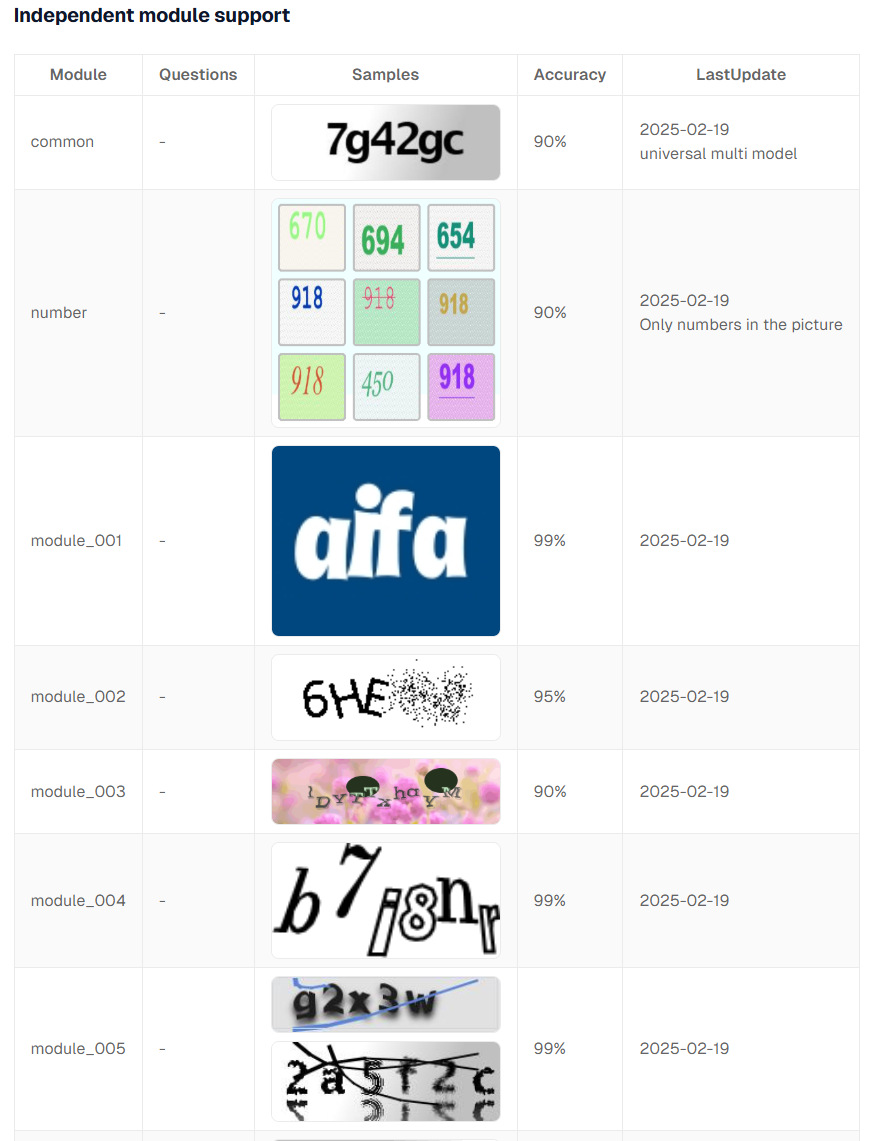
})();Additionally, for some special ImageToText types, you can specify different models to improve accuracy. For details, please refer to our documentation:
https://docs.capsolver.com/en/guide/recognition/ImageToTextTask/
Useful References & Final Notes
To help you get the most out of CapSolver, here are some essential resources:
Useful References
- CapSolver Documentation
- CapSolver Extension GitHub Releases
- CapSolver Extension on Chrome Web Store
- CapSolver Extension on Firefox Add-ons
- Human-like Score Solver for reCAPTCHA v3
Demo Videos Featuring the CapSolver Extension:
- Solve reCAPTCHA v3 with CapSolver Chrome Extension
- Solve reCAPTCHA v2 with CapSolver Chrome Extension
- Solve reCAPTCHA with Puppeteer & CapSolver Extension
- Solve ImageToText with Puppeteer & CapSolver Extension
Here are some powerful configuration options you can leverage for even better captcha solving:
| Config Option | Purpose |
|---|---|
solvedCallback |
Callback triggered when CAPTCHA is successfully solved |
manualSolving |
Enable delay so solving only starts when explicitly triggered |
reCaptchaMode |
Choose between solving by “click” or by “token” |
useProxy |
Enable use of your own proxy during captcha solving |
textCaptchaSourceAttribute |
Custom attribute to tag captcha image elements (ImageToText) |
textCaptchaResultAttribute |
Custom attribute to tag input fields where captcha results go |
Additionally, CapSolver offers a Developer Revenue Sharing Program, allowing developers and partners to earn commissions by integrating or promoting CapSolver solutions. It’s a great way to monetize your work while helping others solve captchas efficiently. For full details, check out:
CapSolver Developer Plan
By integrating CapSolver’s API with Puppeteer as demonstrated, you gain full control, flexibility, and detailed error feedback—perfect for developers looking for a robust, scalable solution beyond browser extensions.
For more details and advanced usage, be sure to check out the official documentation and tutorials linked above.
Thank you for choosing CapSolver! If you have any questions or need support, our team is always ready to help.
More
aws wafJul 23, 2026
How to Solve AWS WAF in LangChain with CapSolver
Build an authorized AWS WAF LangChain workflow with CapSolver tools, response detection, policy gates, session handling, retries, and verification.

AIJul 23, 2026
How to Solve Cloudflare Turnstile in LangGraph Agents
Build a LangGraph Cloudflare Turnstile solver workflow with CapSolver, Playwright session handling, policy gates, retries, verification, and review.