How to Implement CAPTCHA Solving API in JavaScript

Lucas Mitchell
Automation Engineer
TL;DR
- CapSolver exposes a simple REST API: call
/createTaskto submit a CAPTCHA, then poll/getTaskResultuntilstatus === 'ready'. - Supported challenge types in this guide: reCAPTCHA v2, reCAPTCHA v3, and Cloudflare Turnstile.
- Store your API key in
.env—never hardcode it. - Use
axios+ a polling loop for a clean, production-ready Node.js integration. - Add retry logic with exponential backoff for resilience in long-running automation jobs.
Introduction
Modern web automation and data collection projects often encounter CAPTCHA challenges that interrupt workflows. Whether you're building a web scraper, automating browser tasks, or developing an AI agent, integrating a reliable CAPTCHA solving solution becomes essential. CapSolver provides an AI-powered API that handles these challenges programmatically, and this guide walks you through implementing it in JavaScript from scratch.
Automated traffic now accounts for nearly half of all internet traffic, making bot detection and CAPTCHA challenges increasingly common across web applications. For developers building legitimate automation workflows, having a reliable programmatic solution is no longer optional—it's a core infrastructure requirement.
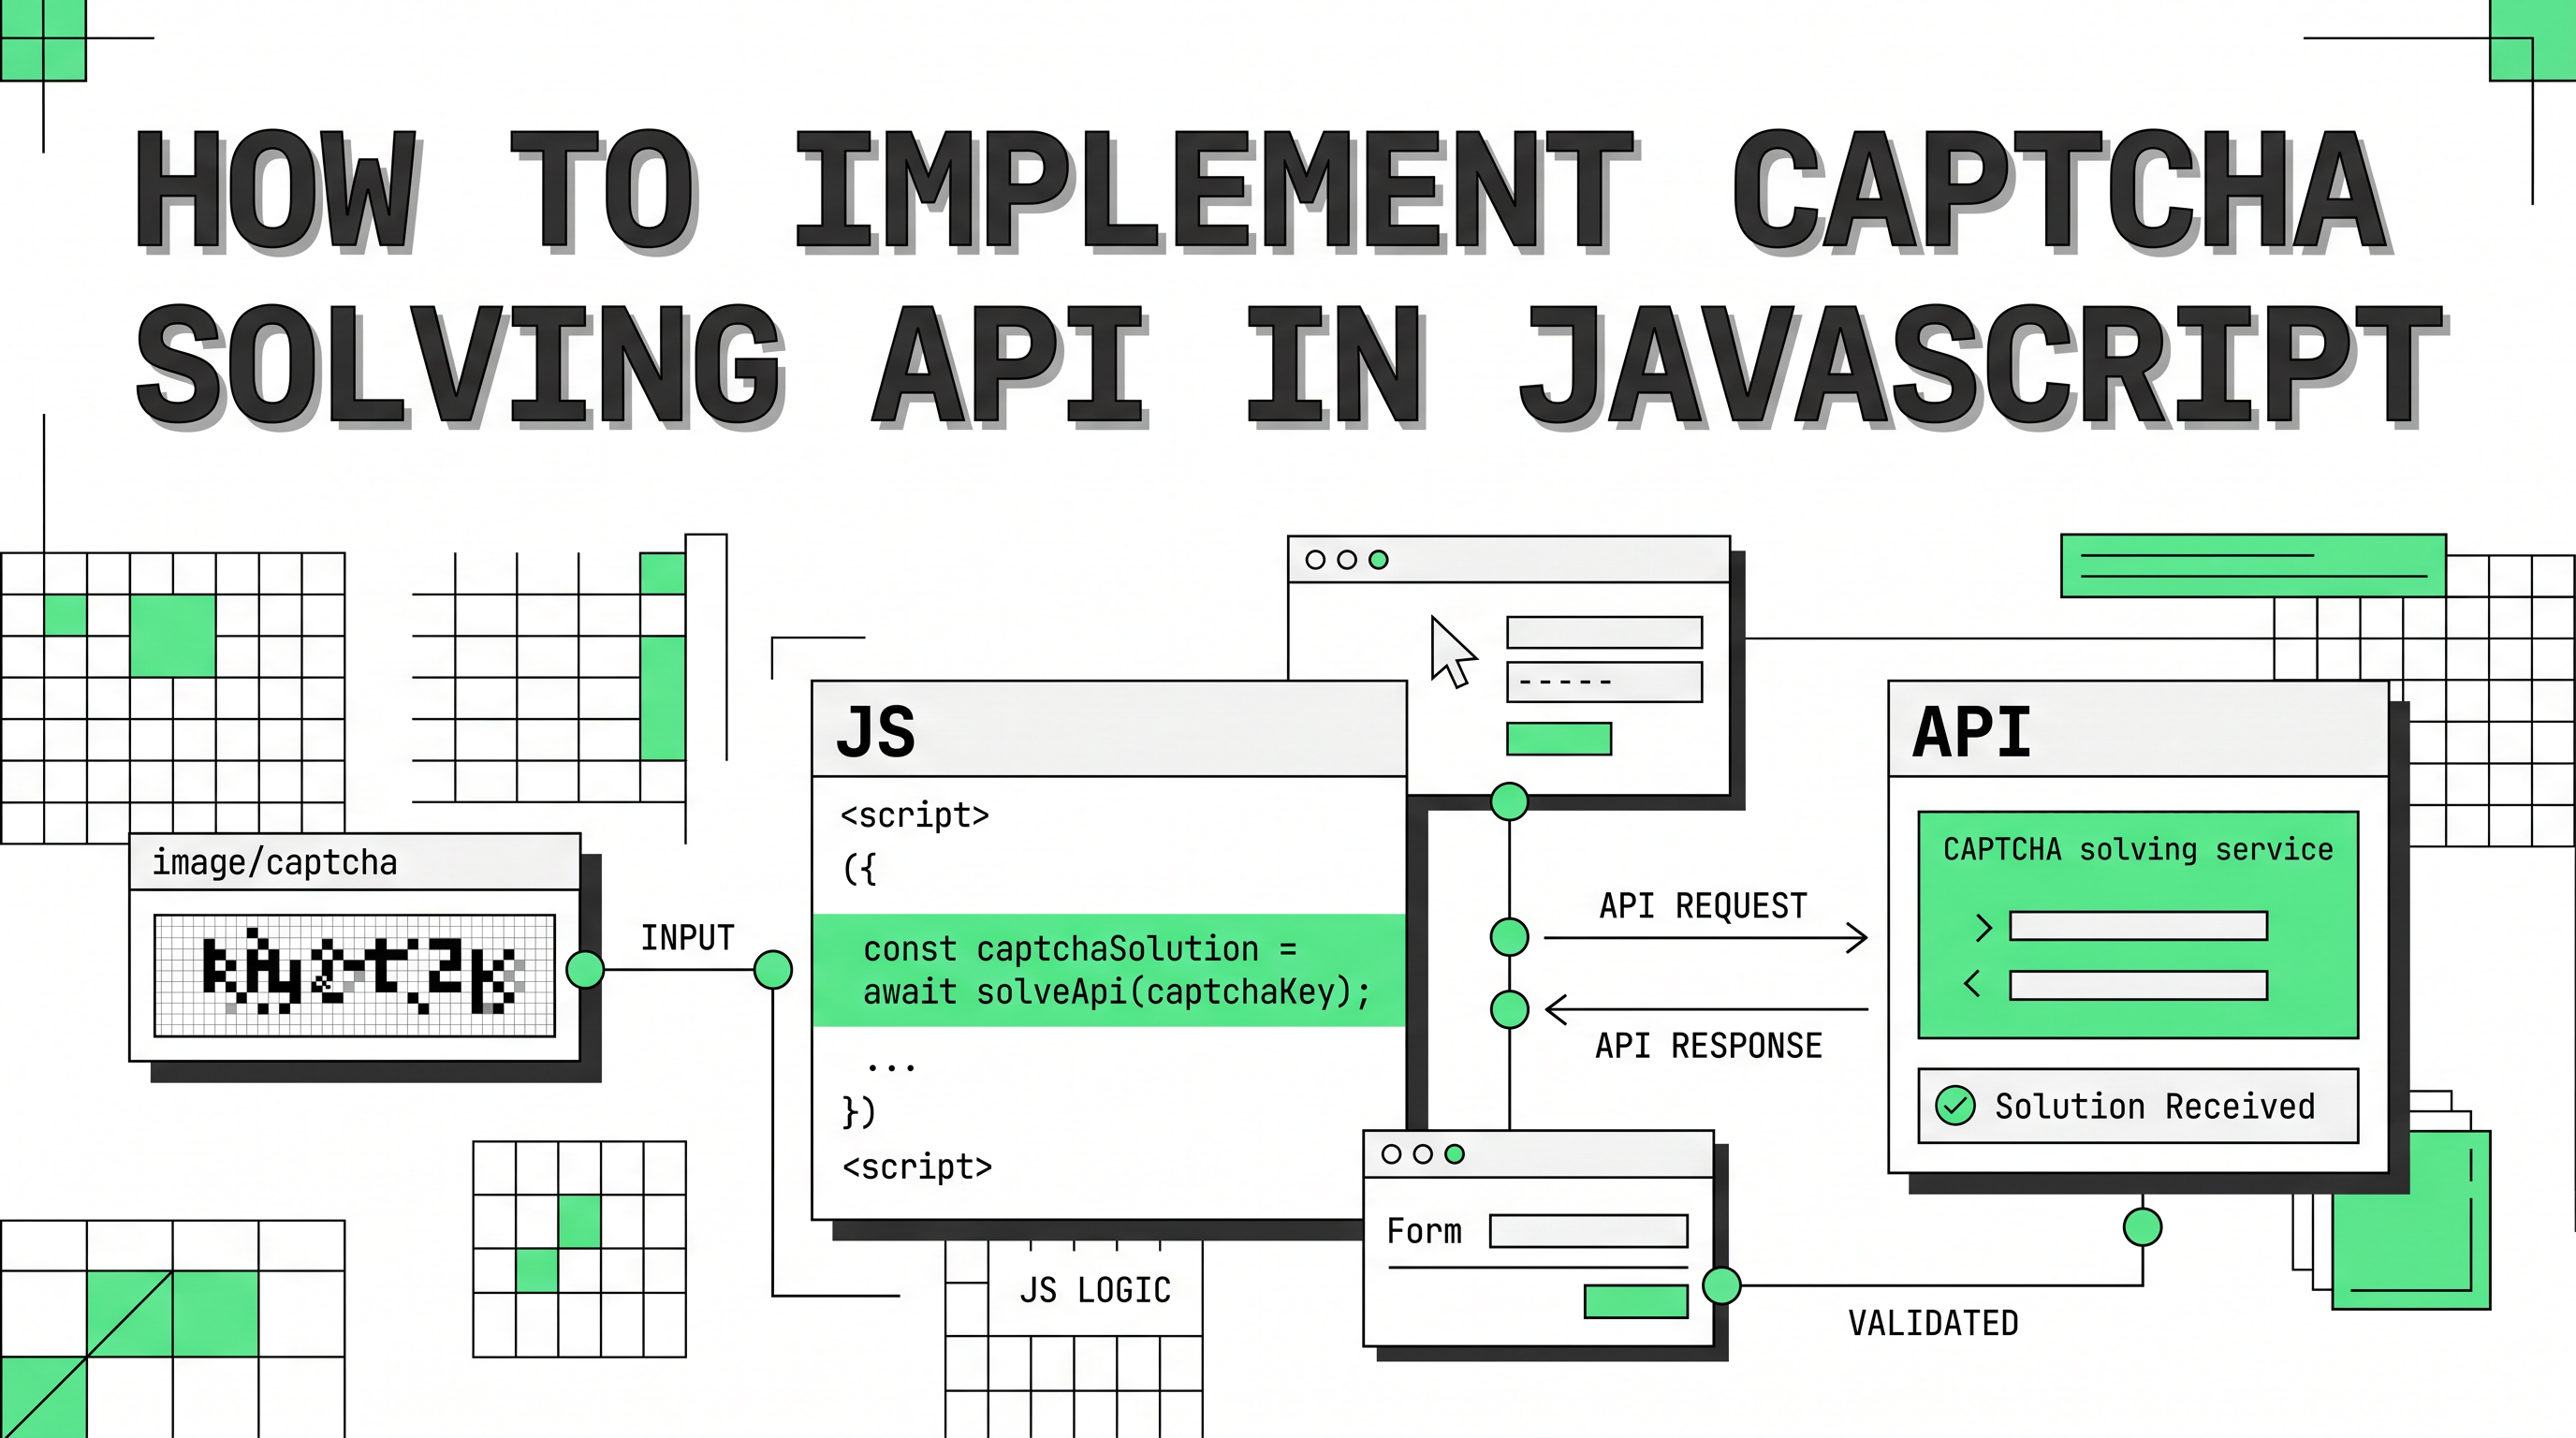
Understanding the CapSolver API Workflow
Before diving into code, understanding how CapSolver processes CAPTCHA requests helps you architect your integration correctly. The workflow follows a simple pattern: submit a task, poll for completion, and receive the solution.
When you submit a CAPTCHA challenge to CapSolver, the system assigns it a unique task identifier. Your application then polls the service at regular intervals until the solution is ready. Once completed, you receive a response containing the token or data needed to proceed with your automation workflow.
CapSolver supports various CAPTCHA types including reCAPTCHA v2/v3, Cloudflare Turnstile, and Image-to-Text challenges. The API workflow remains consistent across challenge types, though task parameters vary based on the specific solution required. For a full list of supported task types, refer to the CapSolver task type reference. If you're new to the platform, the getting started guide covers account setup and your first API call. For a broader overview of how CapSolver fits into real scraping pipelines, see how to integrate CapSolver into your automation workflow.
Project Setup
This guide walks you through implementing CapSolver's CAPTCHA solving API specifically for JavaScript and Node.js projects. Ensure you have Node.js 18+ installed and a CapSolver API key ready from your account dashboard.
Project structure:
capsolver-integration/
├── .env                 # Environment variables
├── capsolver-client.js  # Core API client
├── index.js             # Usage example
└── package.json
Initialize your project and install dependencies:
bash
mkdir capsolver-integration
cd capsolver-integration
npm init -y
npm install axios dotenv
axios is a widely-used HTTP client for Node.js that provides clean promise-based syntax and built-in timeout handling—both useful when polling an external API.
Create a .env file to store your API key securely:
CAPSOLVER_API_KEY=your-api-key-hereSecurity note: Never commit your
.envfile to version control. Add it to.gitignoreimmediately. Exposed API keys can lead to unauthorized usage and unexpected charges. See OWASP Secrets Management for best practices on handling credentials in automation projects.
Creating the Core API Client
The foundation of your integration is a reusable client that handles authentication and request formatting. This client encapsulates the API endpoint and provides methods for each operation. Save this as capsolver-client.js:
javascript
// capsolver-client.js
const axios = require('axios');

class CapSolverClient {
  constructor(apiKey) {
    this.apiKey = apiKey;
    this.baseUrl = 'https://api.capsolver.com';
  }

  async request(endpoint, data) {
    const response = await axios.post(`${this.baseUrl}${endpoint}`, {
      ...data,
      clientKey: this.apiKey
    }, {
      headers: { 'Content-Type': 'application/json' },
      timeout: 30000
    });
    return response.data;
  }

  delay(ms) {
    return new Promise(resolve => setTimeout(resolve, ms));
  }
}

module.exports = CapSolverClient;
Note: The code examples in this guide illustrate implementation patterns based on CapSolver's documented API structure. Always verify the latest endpoint paths, task type names, and request/response formats against the official CapSolver API documentation, as these details may change.
This client handles the repetitive aspects of API communication, including setting headers and formatting the request body with your client key.
Checking Your Account Balance
Before solving CAPTCHAs at scale, verify your account has sufficient credits. CapSolver operates on a pay-per-successful-solution model, so checking your balance prevents unexpected failures mid-workflow.
javascript
// Add to CapSolverClient class
async getBalance() {
  const result = await this.request('/getBalance', {});

  if (result.errorCode) {
    throw new Error(`Balance check failed: ${result.errorCode} - ${result.errorDescription}`);
  }

  return {
    balance: result.balance,
    currency: result.currency || 'USD'
  };
}
Many developers incorporate a balance check into their initialization sequence to fail fast if credits are depleted before a long automation run begins.
Solving reCAPTCHA v2
reCAPTCHA v2 presents the familiar checkbox challenge or image selection tasks. To solve these, you need the target page's URL and the site key embedded in the page's HTML. The solved token is then submitted as part of the form or request.
javascript
// Add to CapSolverClient class
async solveReCaptchaV2(websiteUrl, websiteKey) {
  const task = {
    type: 'RecaptchaV2Task',
    websiteURL: websiteUrl,
    websiteKey: websiteKey
  };
  return await this.submitAndWait(task);
}

async submitAndWait(task) {
  // Step 1: Submit the task
  const submitResult = await this.request('/createTask', { task });

  if (submitResult.errorCode) {
    throw new Error(`Task creation failed: ${submitResult.errorCode}`);
  }

  const taskId = submitResult.taskId;

  // Step 2: Poll for the result
  while (true) {
    await this.delay(1500);

    const result = await this.request('/getTaskResult', { taskId });

    if (result.status === 'ready') {
      return result.solution;
    }

    if (result.status === 'failed') {
      throw new Error(`Solving failed: ${result.errorDescription || 'Unknown error'}`);
    }
    // status === 'processing' → continue polling
  }
}
The polling interval of 1.5 seconds balances responsiveness with API rate limits. The status field will be processing while the task is running, ready when the solution is available, or failed if the challenge could not be solved. For the full response schema, see the getTaskResult API reference.
Solving reCAPTCHA v3
reCAPTCHA v3 operates differently—it runs invisibly in the background and returns a risk score rather than presenting a visual challenge. CapSolver can solve v3 challenges while allowing you to specify the minimum score threshold required by your target site.
javascript
// Add to CapSolverClient class
async solveReCaptchaV3(websiteUrl, websiteKey, options = {}) {
  const {
    pageAction = 'verify',
    minScore = 0.9
  } = options;

  const task = {
    type: 'RecaptchaV3Task',
    websiteURL: websiteUrl,
    websiteKey: websiteKey,
    pageAction: pageAction,
    minScore: minScore
  };

  return await this.submitAndWait(task);
}
reCAPTCHA v3 tasks typically complete faster than v2 tasks since they don't require interaction with visual challenges. The pageAction parameter should match the action string defined on the target page.
Solving Cloudflare Turnstile
Cloudflare Turnstile challenges frequently appear in automation workflows, particularly when scraping sites protected by Cloudflare. CapSolver provides dedicated support for these challenges:
javascript
// Add to CapSolverClient class
async solveTurnstile(websiteUrl, websiteKey, options = {}) {
  const {
    pageAction = 'managed',
    metadata = {}
  } = options;

  const task = {
    type: 'AntiCloudflareTask',
    websiteURL: websiteUrl,
    websiteKey: websiteKey,
    pageAction: pageAction,
    metadata: metadata
  };

  return await this.submitAndWait(task);
}
For more advanced Cloudflare scenarios—including challenge pages and browser fingerprinting—see the guide on automating CAPTCHA solving in headless browsers.
Putting It All Together
Here's a complete index.js demonstrating how to use the client in a real automation scenario:
javascript
// index.js
const CapSolverClient = require('./capsolver-client');
require('dotenv').config();

async function main() {
  const client = new CapSolverClient(process.env.CAPSOLVER_API_KEY);

  try {
    // Check balance before starting
    const { balance, currency } = await client.getBalance();
    console.log(`Account balance: ${balance} ${currency}`);

    if (balance < 0.01) {
      throw new Error('Insufficient balance. Please top up your CapSolver account.');
    }

    // Example: Solve reCAPTCHA v2
    const solution = await client.solveReCaptchaV2(
      'https://example.com/login',
      '6Le-wvkAAAAAATBQbZDLjMjqTLV92vP6EXjs'
    );

    console.log('CAPTCHA solved successfully');
    console.log('Token:', solution.gRecaptchaResponse);

    // Inject the token into your automation workflow
    // await page.evaluate(token => {
    //   document.getElementById('g-recaptcha-response').value = token;
    // }, solution.gRecaptchaResponse);

  } catch (error) {
    console.error('Error:', error.message);
    process.exit(1);
  }
}

main();
Error Handling and Retries
Production integrations need robust error handling. Network issues, temporary API outages, and CAPTCHA failures can occur, so implementing retry logic improves reliability significantly:
javascript
async function withRetry(operation, maxAttempts = 3, delayMs = 2000) {
  let lastError;

  for (let attempt = 1; attempt <= maxAttempts; attempt++) {
    try {
      return await operation();
    } catch (error) {
      lastError = error;
      console.warn(`Attempt ${attempt}/${maxAttempts} failed: ${error.message}`);

      if (attempt < maxAttempts) {
        await new Promise(resolve => setTimeout(resolve, delayMs * attempt));
      }
    }
  }

  throw lastError;
}

// Usage
const solution = await withRetry(() =>
  client.solveReCaptchaV2('https://example.com', 'your-site-key')
);
The exponential backoff (delayMs * attempt) prevents hammering the API during transient failures and gives the service time to recover.
Best Practices for JavaScript Integration
Secure your API key. Always load credentials from environment variables, never hardcode them. Use .env files locally and proper secrets management in CI/CD pipelines.
Set task timeouts. Add a maximum polling duration to prevent your automation from hanging indefinitely if a task stalls. A timeout of 120 seconds covers the vast majority of solving scenarios.
Monitor your balance programmatically. For long-running automation jobs, check your balance at startup and optionally at regular intervals. This prevents silent failures mid-run.
Match task type to challenge. Using the wrong task type is a common source of failures. Always inspect the target page's HTML to confirm the CAPTCHA type and extract the correct site key before submitting a task.
Respect rate limits. Avoid submitting tasks faster than your workflow can consume results. Queuing tasks and processing them at a controlled rate leads to more stable throughput.
For a broader look at integrating CAPTCHA solving into scraping pipelines, see how to integrate CapSolver into your automation or scraping workflow, which covers additional patterns including Puppeteer and Playwright. If your project involves headless browsers specifically, automating CAPTCHA solving in headless browsers walks through the full setup end-to-end.
FAQ
Q: Do I need a proxy to use the CapSolver API?
A: No. For most task types, CapSolver handles the solving on its own infrastructure and you only need to pass the target URL and site key. Proxy configuration is optional and only required for certain task variants that need to simulate a browser session from a specific IP. See the proxy usage guide for details.
Q: How long does it take to solve a CAPTCHA?
A: Solve times vary by challenge type. reCAPTCHA v3 typically resolves in under 5 seconds. reCAPTCHA v2 and Cloudflare Turnstile may take 10–30 seconds depending on challenge difficulty and current queue load. The polling loop in this guide handles variable solve times automatically.
Q: What happens if my balance runs out mid-run?
A: The API will return an error code on the next /createTask call. The client in this guide throws an error in that case, which you can catch and handle—for example, by sending an alert or pausing the job. Adding a balance check at startup (as shown in the guide) is the simplest way to prevent this.
Q: Can I use this client in a browser (frontend JavaScript)?
A: No. Your API key must remain server-side. Exposing it in frontend code would allow anyone to use your credits. Always call the CapSolver API from a Node.js backend, serverless function, or other server-side environment.
Q: What should I do if a task returns failed?
A: A failed status usually means the challenge parameters were incorrect (wrong site key, mismatched task type, or an unsupported page configuration). Check the errorDescription field in the response, verify your task parameters against the task type documentation, and retry with corrected values. You can also check the CapSolver FAQ for common error patterns.
Q: Is there an official JavaScript/Node.js SDK?
A: CapSolver provides official SDKs for multiple languages. For JavaScript projects, you can use the patterns in this guide directly, or check the CapSolver GitHub for any published npm packages and code samples.
Next Steps
With this implementation, you have a solid foundation for adding CAPTCHA solving capabilities to your JavaScript automation projects. You can extend this client with additional task types, integrate it with browser automation tools like Puppeteer or Playwright, or combine it with an AI scraping workflow for more advanced data extraction pipelines.
For other challenge types and their specific parameters, refer to the official task type documentation.
Start solving CAPTCHAs in your JavaScript projects today with CapSolver—create your account, grab your API key, and drop the client code above into your next automation project.
More
Web ScrapingApr 22, 2026
Rust Web Scraping Architecture for Scalable Data Extraction
Learn scalable Rust web scraping architecture with reqwest, scraper, async scraping, headless browser scraping, proxy rotation, and compliant CAPTCHA handling.
Web ScrapingApr 17, 2026
How to Scrape Job Listings Without Getting Blocked
Learn the best techniques to scrape job listings without getting blocked. Master Indeed scraping, Google Jobs API, and web scraping API with CapSolver.